Welcome to Blog Safari

A theme for those who love something unique and creative, created by Template Trackers

Showing posts with label widgets. Show all posts
This navigation bar gets semi-transparent when you scroll down the page and is slightly showing up by fading out and becoming almost transparent. When the user hovers over it, the menu becomes opaque again.

Inside of the navigation there are some links, a search input and a top and bottom button that allows the userto navigate to the top or bottom of the page.


Let's start adding it...

1. Go To Blogger - Template - Edit HTML


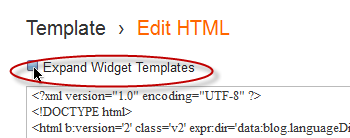
 ....and select the "expand widget templated" box:


2. Search (using CTRL + F) for this piece of code:

 </head> 

3. Just above/before the </head> tag, add this code:

 <link rel="stylesheet" href="http://helplogger.googlecode.com/svn/trunk/html/[helplogger.blogspot.com]Fixed Fade Out Menu.css"/>
<script type="text/javascript" src="http://helplogger.googlecode.com/svn/trunk/html/[helplogger.blogspot.com]jquery-1.3.2.js"></script>
 <script type="text/javascript">
            $(function() {
                $(window).scroll(function(){
                    var scrollTop = $(window).scrollTop();
                    if(scrollTop != 0)
                        $('#nav').stop().animate({'opacity':'0.2'},400);
                    else   
                        $('#nav').stop().animate({'opacity':'1'},400);
                });
               
                $('#nav').hover(
                    function (e) {
                        var scrollTop = $(window).scrollTop();
                        if(scrollTop != 0){
                            $('#nav').stop().animate({'opacity':'1'},400);
                        }
                    },
                    function (e) {
                        var scrollTop = $(window).scrollTop();
                        if(scrollTop != 0){
                            $('#nav').stop().animate({'opacity':'0.2'},400);
                        }
                    }
                );
            });
        </script>

4) Now search for this tag:

 <body>  

If you can't find it, search for this one:

 <body expr:class='&quot;loading&quot; + data:blog.mobileClass'>

5) Just below/after this code, copy and paste the following code:

 <div id="nav">
<ul>
<li><a class="top" href="#top"><span></span></a></li>
<li><a class="bottom" href="#bottom"><span></span></a></li>
<li><a href='URL address'><span>Link 1</span></a></li>
<li><a href='URL address'><span>Link 2</span></a></li>
<li><a href='URL address'><span>Link 3</span></a></li>
<li><a href='URL address'><span>Link 4</span></a></li>
<li><a href='URL address'><span>Link 5</span></a></li>
<li><a href='URL address'><span>Link 6</span></a></li><li class="search">

<input type="text"/><input class="searchbutton" type="submit" value=""/>
</li>
</ul>
</div>
<div id="top"></div>
<div class="desc"></div>
<div id="bottom"></div>
<div class="scroll"></div>

Note: Replace URL address with the URL of your pages and Link 1, 2, 3, 4, 5, 6 with the name of the link that will appear in the menu. 

6) Now click on the Save Template button and you're done ;)
Now here is a wonderful hack for displaying related posts beneath each of your blog posts, along with thumbnails. The related articles are chosen from other posts in that same category/label/tag. With this hack many of your readers will remain on your site for longer periods of time when they see related posts of interest.
related post, related posts blogger, blogger widgets
Steps adding the Related Posts Widget to Blogger/Blogspot

Step 1. Go To Blogger Dashboard >> Template >>Edit HTML

blogger template, edit html

Step 2. Click anywhere inside the template's code and press the CTRL + F keys

Step 3. Search for this piece of code by typing it inside the search box:
 </head>
Step 4. Copy and paste the below code just before/above </head>
 <!--Related Posts with thumbnails Scripts and Styles Start-->
<!-- remove --><b:if cond='data:blog.pageType == &quot;item&quot;'>
<style type='text/css'>
#related-posts{float:left;width:auto;}
#related-posts a{border-right: 1px dotted #eaeaea;}
#related-posts a:hover{background: #f2f2f2;}
#related-posts h2{margin-top: 10px;background:none;font:18px Oswald;padding:3px;color:#999999; text-transform:uppercase;}
#related-posts .related_img {margin:5px;border:4px solid #f2f2f2;width:100px;height:100px;transition:all 300ms ease-in-out;-webkit-transition:all 300ms ease-in-out;-moz-transition:all 300ms ease-in-out;-o-transition:all 300ms ease-in-out;-ms-transition:all 300ms ease-in-out;}
#related-title {color:#222;text-align:center;padding: 0 10px;font-size:14px Oswald; line-height:16px;text-shadow:0 2px 2px #fff;height:28px;width:100px;}
#related-posts .related_img:hover{border:4px solid #E8E8E8;opacity:.7;filter:alpha(opacity=70);-moz-opacity:.7;-khtml-opacity:.7}</style>
<script type='text/javascript' src='http://helplogger.googlecode.com/svn/trunk/relatedposts.js' />
<!-- remove --></b:if>
<!--Related Posts with thumbnails Scripts and Styles End-->
Note:
- to change the width and height of thumbnails, modify the 100px value in red
- to change the color and size of related posts titles, change the value in blue
- remove the line in violet if you want the related posts to be displayed in homepage too 

Step 5. Now find the following code (you might find it twice, stop at the second one):
 <div class='post-footer'>
Step 6. And just above it, copy and paste the below code:
 <!-- Related Posts with Thumbnails Code Start-->
<b:if cond='data:blog.pageType == &quot;item&quot;'>
<div id='related-posts'>
<b:loop values='data:post.labels' var='label'>
<b:if cond='data:label.isLast != &quot;true&quot;'>
</b:if>
<b:if cond='data:blog.pageType == &quot;item&quot;'>
<script expr:src='&quot;/feeds/posts/default/-/&quot; + data:label.name + &quot;?alt=json-in-script&amp;callback=related_results_labels_thumbs&amp;max-results=5&quot;' type='text/javascript'/></b:if></b:loop>
<script type='text/javascript'>
var currentposturl=&quot;<data:post.url/>&quot;;
var maxresults=5;
var relatedpoststitle=&quot;<b>Related Posts:</b>&quot;;
removeRelatedDuplicates_thumbs();
printRelatedLabels_thumbs();
</script>
</div><div class='clear'/>
</b:if>
<b:if cond='data:blog.url == data:blog.homepageUrl'><b:if cond='data:post.isFirstPost'>
<a href='http://helplogger.blogspot.com'><img alt='Blogger Tricks' src='https://blogger.googleusercontent.com/img/b/R29vZ2xl/AVvXsEgDmJG03JhvIm3oc72bes-WlPKenocHVZyDHhpuNk9vPysE86kE0MrfHKJmfyaJMqpvvqP0P6v97FOMu77FTdP3jH9HIU8LSgctW9CxkdUo1hsMxFT96ImRt7zbrfZ-LhJgIfQrosgXgNKA/s1600/best+blogger+tips.png'/></a>
</b:if></b:if><!-- Related Posts with Thumbnails Code End-->
Note:
- change the 5 value from max-results=5 with the number of posts you want to be displayed
- if you want the related posts to be displayed on homepage too, then remove the lines in violet

Step 7. Save the Template

Enjoy :)
In this tutorial i will show you how to add a cool floating Facebook like widget for Blogger that slides to the left on mouseover. Demo: You can see a static facebook badge at the right side of this blog


Adding Static Facebook Like widget on blogger

Just follow the steps: 

1. Log in to your Blogger Dashboard, go to Design >> Edit HTML

2. Check the "Expand Widget Templates" box

3. Search (CTRL + F) for this tag:

</head>

4. Add the following code just before/above </head> tag:

<script src="https://ajax.googleapis.com/ajax/libs/jquery/1.7.1/jquery.min.js"></script>

5. Save the Template.

6. Now go to Design >> Page Elements >> Add a new Gadget >> Choose HTML/JavaScript and in the HTML box, paste the code below:

<style type="text/css">
/*<![CDATA[*/
#fbplikebox{display: block;padding: 0;z-index: 99999;position: fixed;}
.fbplbadge {background-color:#3B5998;display: block;height: 150px;top: 50%;margin-top: -75px;position: absolute;left: -47px;width: 47px;background-image: url("https://blogger.googleusercontent.com/img/b/R29vZ2xl/AVvXsEjTmCvrsCQ6iV2_g6ov0Ne-8DPZsz4Fj-QMYRfyOUsPH4g0Cd2CkRznAf43YPusK0QHrBtIbLqKH1fYZEWf97wlF6VOk7H36_WMj-dw5Pj0DFc7DC4l6ria62k1kHmUOfbRNQxwSvfh91Y/s1600/vertical-right.png");background-repeat: no-repeat;overflow: hidden;-webkit-border-top-left-radius: 8px;-webkit-border-bottom-left-radius: 8px;-moz-border-radius-topleft: 8px;-moz-border-radius-bottomleft: 8px;border-top-left-radius: 8px;border-bottom-left-radius: 8px;}
/*]]>*/
</style>
<script type="text/javascript">
/*<![CDATA[*/
    (function(w2b){
        w2b(document).ready(function(){
            var $dur = "medium"; // Duration of Animation
            w2b("#fbplikebox").css({right: -250, "top" : 100 })
            w2b("#fbplikebox").hover(function () {
                w2b(this).stop().animate({
                    right: 0
                }, $dur);
            }, function () {
                w2b(this).stop().animate({
                    right: -250
                }, $dur);
            });
            w2b("#fbplikebox").show();
        });
    })(jQuery);
/*]]>*/
</script>
<div id="fbplikebox" style="display:none;">
    <div class="fbplbadge"></div>
    <iframe src="http://www.facebook.com/plugins/likebox.php?href=YOUR-FACEBOOK-PAGE&amp;width=250&amp;height=250&amp;colorscheme=light&amp;show_faces=true&amp;border_color=%23C4C4C4&amp;stream=false&amp;header=false" scrolling="no" frameborder="0" style="border:none; overflow:hidden; width:250px; height:250px;background:#FFFFFF;" allowtransparency="true"></iframe>
</div>

7. Replace YOUR-FACEBOOK-PAGE text above with the URL of your facebook fan page.
Also replace the : symbol in your URL with %3A and / with %2F

For example, my facebook fan page is:

http://www.facebook.com/pages/Helplogger/120574614736021

After replacing the characters above, your facebook fan page should look like this:
http%3A%2F%2Fwww.facebook.com%2Fpages%2FHelplogger%2F120574614736021

Other settings (optional):
- to change the width and height of the facebook box, change the bolded values (250)
- to change the background color of the facebook fan box, replace #FFFFFF with the hex code of your color (you can choose it from here)
- if you want to change the color of the facebook badge (facebook button) replace this code #3B5998
with your own.

8. Now you can save your widget. Enjoy!
The main advantage on this Recent Posts widget is that it will show not only post titles but also post excerpts or snippets and it's easy to customize/ apply different style on it. To style it into your own design, you just have to modify the CSS style - you can change the link or background color, the size and color of text/links. 

What you can do with this widget:
  • display post titles only
  • change the number of posts
  • change the number of characters of the post snippet/excerpt
  • show the post dates

See the screenshot below:

How to add Recent Posts Widget to Blogger

Step 1. Log in to your Blogger Dashboard, then go to Layout and click on Add a Gadget link


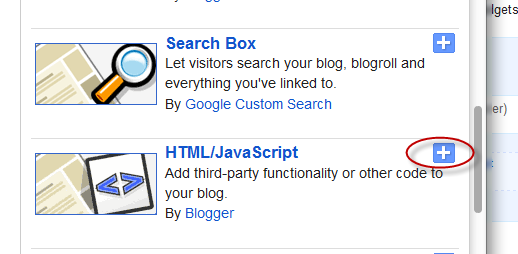
Step 2. From the pop-up window, scroll down and choose HTML/JavaScript


Step 3. Select & Copy the code from one of the options below and paste it into the new HTML/JavaScript: 

Option 1: Recent posts widget with snippets

 <div id="hlrpsa">
<script src="http://helplogger.googlecode.com/svn/trunk/recent-posts-with-snippets.js">
</script>
<script>
var numposts = 5;var showpostdate = false;var showpostsummary = true;var numchars = 100;var standardstyling = true;
</script>
<script src="http://your-blog.blogspot.com/feeds/posts/default?orderby=published&amp;alt=json-in-script&amp;callback=showrecentposts">
</script></div>
<div id="rpdr" style="font-family: arial, sans-serif; font-size: 9px;">
<a href="http://helplogger.blogspot.com/2012/04/recent-posts-widget-for-bloggerblogspot.html" target="_blank" title="Grab this Recent Posts Widget">Recent Posts Widget</a> by <a href="http://helplogger.blogspot.com" title="Recent Posts Widget">Helplogger</a></div>
<noscript>Your browser does not support JavaScript!</noscript>
<style type="text/css">
#hlrpsa a {color: #0B3861; font-size: 13px;} #rpdr {background: url(https://blogger.googleusercontent.com/img/b/R29vZ2xl/AVvXsEjD3n_r1tgOvh8WRqz3KxD6CTnDZbWnkMt8JZJCoFeOhYjMlz4LZnjo5Q3uHWcgumWZqIPg8ehkSiT-hsfwhmo2lUSBVoCb4xXv90mC3J2K9jPKpoSXVf3PFYJiba1-VNvnDZ-92SfZNg_o/s1600/blogger.png) 0px 0px no-repeat; padding: 1px 0px 0px 19px; height:14px; margin: 5px 0px 0px 0px;line-height:14px;}
#rpdr, #rpdr a {color:#808080;}
#hlrpsa { color: #999999; font-size: 11px; border-bottom:1px #cccccc dotted; margin-top:-10px; padding-bottom:10px;}
.hlrps a {font-weight:bold; }
.hlrpssumm {}
</style>

Option 2: Recent Posts Widget Showing Post Titles Only

 <div id="hlrpsb">
<script style="text/javascript" src="http://helplogger.googlecode.com/svn/trunk/recent-posts-with-titles-only.js"></script>
<script style="text/javascript">var numposts = 10;var showpostdate = false;var showpostsummary = false;var numchars = 100;var standardstyling = true;</script>
<script src="http://your-blog.blogspot.com/feeds/posts/default?orderby=published&alt=json-in-script&callback=showrecentposts"></script></div>
<div style="font-family: arial, sans-serif; font-size: 9px;" id="rpdr"><a href="http://helplogger.blogspot.com/2012/04/recent-posts-widget-for-bloggerblogspot.html" title="Grab this Recent Posts Widget" target="_blank">Recent Posts Widget</a> by <a href="http://helplogger.blogspot.com" title="Recent Posts Widget">Helplogger</a></div><noscript>Oops! Make sure JavaScript is enabled in your browser.</noscript>
<style type=text/css>
#hlrpsb a {color: #0B3861; font-size: 13px;} #rpdr {background: url( https://blogger.googleusercontent.com/img/b/R29vZ2xl/AVvXsEjD3n_r1tgOvh8WRqz3KxD6CTnDZbWnkMt8JZJCoFeOhYjMlz4LZnjo5Q3uHWcgumWZqIPg8ehkSiT-hsfwhmo2lUSBVoCb4xXv90mC3J2K9jPKpoSXVf3PFYJiba1-VNvnDZ-92SfZNg_o/s1600/blogger.png ) 0px 0px no-repeat; padding: 1px 0px 0px 19px; height:14px; margin: 5px 0px 0px 0px;line-height:14px;}
#rpdr, #rpdr a {color:#808080;}
.bbrecpost2 {
padding-top:6px;
padding-bottom:6px;
border-bottom: 1px #cccccc dotted; }
</style>

Step 4.
  • Change 5 (option 1) and 10 (option 2) with the number of posts you want to display. 
  • Change false to true if you want the posts dates to appear 
  • Change 100 (option 1) if you want more characters to be displayed.
  • To change the color and font size of the links, modify the values in blue (links) and violet (font-size)
  • To change the style of posts summary, modify the values in green (color) and orange (font size)
  • Replace the your-blog text with the name of your blog or if you have a custom domain change all the bolded line with your address like in this example:
 http://www.your-site.com/feeds/posts/default....

Step 5. Save your widget. And that's it! Enjoy!
The Google Translate Widget for Blogger allows the visitors to translate your site or blog in their own language. 
This widget also auto-detect your blog language and then translate it to the readers chosen language.

It supports 12 different languages:
English, French, German, Spanish, Italian, Dutch, Portuguese, Russian, Japanese, Korean, Arabic And Chinese.
google translate for blogger, blogger gadgets, blogger tricks

How To Add The Google Translate Widget To Blogger

Step 1. Go to your Blogger Dashboard >> Layout and click on "Add A Gadget" link


Step 2. From the pop-up window, scroll down and choose HTML/JavaScript


 Step 3. Paste the code below in the empty box:

<script type="text/javascript">
function showHide(shID) {
    if (document.getElementById(shID)) {
        if (document.getElementById(shID+'-show').style.display != 'none') {
            document.getElementById(shID+'-show').style.display = 'none';
            document.getElementById(shID).style.display = 'block';
        }
        else {
            document.getElementById(shID+'-show').style.display = 'inline';
            document.getElementById(shID).style.display = 'none';
        }
    }
}
</script>

<style>

 .google_translate img {
margin: 10px 20px 0px 20px;
    height: 24px;
    width: 24px;
        }
        .google_translate:hover img {
filter:alpha(opacity=0.30);
        -moz-opacity: 0.30;
        opacity: 0.30;
        border:0;
        }

.more {
    display: none;
a.showLink, a.hideLink {
    text-decoration: none;
    color: #0880C4;
    padding-left: 18px;
    background: transparent('down.gif') no-repeat left; }

a.hideLink {
    background: transparent url('up.gif') no-repeat left;
color: #0880C4;}

a.showLink:hover, a.hideLink:hover {
color: #0880C4;
 }

 </style>

 <div>

 <a class="google_translate" href="#" target="_blank" rel="nofollow" title="English" onclick="window.open('http://translate.google.com/translate?u='+encodeURIComponent(location.href)+'&langpair=auto%7cen&hl=en'); return false;"><img alt="English" border="0" align="absbottom" title="English" height="24" src="https://blogger.googleusercontent.com/img/b/R29vZ2xl/AVvXsEhv00eilCP2QB849ylohXOM7L7j9KlAv3EH1dI8YuAf4vD3ZrF-S86dtlv84FM_DxGMzo_DAyYT6CDv9ESa2_yQ5AhBxXxAOOlStxgtigOe7isvvbWSf6yDHgFaIxjlo8x0KgsS4FsuOUye/s1600/United+Kingdom(Great+Britain).png" style="cursor: pointer;margin-right:8px" width="24"/></a>

 <a class="google_translate" href="#" target="_blank" rel="nofollow" title="French" onclick="window.open('http://translate.google.com/translate?u='+encodeURIComponent(location.href)+'&langpair=auto%7cfr&hl=en'); return false;"><img alt="French" border="0" align="absbottom" title="French" height="24" src="https://blogger.googleusercontent.com/img/b/R29vZ2xl/AVvXsEimTZqfGj1ymDt2BILxVvFoMZ7BJV7ADCrDKR5mILKSq49Ev6yFxOzh1gCYnRGSE6GiBSiMJqoVN9KG8dyLcZE1dlf8zukIl7HuIfRkfZ5zoItKXxx3PB-7HTv3taqj1dFuFkRm0hQgVWEh/s1600/France.png" style="cursor: pointer;margin-right:8px" width="24"/></a>

 <a class="google_translate" href="#" target="_blank" rel="nofollow" title="German" onclick="window.open('http://translate.google.com/translate?u='+encodeURIComponent(location.href)+'&langpair=auto%7cde&hl=en'); return false;"><img alt="German" border="0" align="absbottom" title="German" height="24" src="https://blogger.googleusercontent.com/img/b/R29vZ2xl/AVvXsEjNS9aA4-LEarLp9Dakulayjp3ph7o39h5Gqhnq_9LuYGgMEsvs-Fe49HMuf5RnoOsVOSMWihc1dcFyFUregjGF9jVMW3oIwG64S4Laie0FWDU7uMphuZXtpYqFTvyZ2D7UuZmHUHW1DQxW/s1600/Germany.png" style="cursor: pointer;margin-right:8px" width="24"/></a>

 <a class="google_translate" href="#" target="_blank" rel="nofollow" title="Spain" onclick="window.open('http://translate.google.com/translate?u='+encodeURIComponent(location.href)+'&langpair=auto%7ces&hl=en'); return false;"><img alt="Spain" border="0" align="absbottom" title="Spain" height="24" src="https://blogger.googleusercontent.com/img/b/R29vZ2xl/AVvXsEh5nE-pAKJe6W2QcW1U7Useqn0cS94rJi4apNNGXM5Mf6hkZIACQNmG8queH02UIMWBoGqimq9dye_SLyb6brSUioYvVHbr_U7ve8LDgbGVsa2HXrdAyUXC9SnWnsUwi8TRu7IaZWIjrNgB/s1600/Spain.png" style="cursor: pointer;margin-right:8px" width="24"/></a><a href="#" id="example-show" class="showLink"
onclick="showHide('example');return false;">More</a>
<div id="example" class="more">
 <a class="google_translate" href="#" target="_blank" rel="nofollow" title="Italian" onclick="window.open('http://translate.google.com/translate?u='+encodeURIComponent(location.href)+'&langpair=auto%7cit&hl=en'); return false;"><img alt="Italian" border="0" align="absbottom" title="Italian" height="24" src="https://blogger.googleusercontent.com/img/b/R29vZ2xl/AVvXsEj0G00KujPbnkHQ89oErclSaqgstjU0ZUpdFSoZtIzlmcqQh2h3kN72OkMoGK8CROFlEwUbWSQBMboUbHu5HO3GuLq8nc3AtqbIQJR-OLbHouQHH5jG1GV49x4LWXOjuOnituefhilF2rYU/s1600/Italy.png" style="cursor: pointer;margin-right:8px" width="24"/></a>

 <a class="google_translate" href="#" target="_blank" rel="nofollow" title="Dutch" onclick="window.open('http://translate.google.com/translate?u='+encodeURIComponent(location.href)+'&langpair=auto%7cnl&hl=en'); return false;"><img alt="Dutch" border="0" align="absbottom" title="Dutch" height="24" src="https://blogger.googleusercontent.com/img/b/R29vZ2xl/AVvXsEhLDP-ngY5lilVlpZiB_1apjgyMR8UG8Ssb9QYU6aneSRiDEb-l4jrrjOP8QyZ7hJWqyXionymOaAbcVj7bWnfIkVGTYO3G21dHz8zzrlmrQbrfqOkSajwEJPUmAQPoWYi5YKljp3u9udAm/s1600/Netherlands.png" style="cursor: pointer;margin-right:8px" width="24"/></a>
      <a class="google_translate" href="#" target="_blank" rel="nofollow" title="Russian" onclick="window.open('http://translate.google.com/translate?u='+encodeURIComponent(location.href)+'&langpair=auto%7cru&hl=en'); return false;"><img alt="Russian" border="0" align="absbottom" title="Russian" height="24" src="https://blogger.googleusercontent.com/img/b/R29vZ2xl/AVvXsEjKr_dhXd9xFk4sludy16P_15bCVQ1FBFySWKYoqqOgD2iLYqWyJqIgvQogDM7Ar32M42x1GsckuhyDpV2WVmjCf9QiCgpVjdrQnLK8jev0JQMF7sAZsbpI1b2uaZZVQESazOnpxBWQ-a-C/s1600/Russian+Federation.png" style="cursor: pointer;margin-right:8px" width="24"/></a>

 <a class="google_translate" href="#" target="_blank" rel="nofollow" title="Portuguese" onclick="window.open('http://translate.google.com/translate?u='+encodeURIComponent(location.href)+'&langpair=auto%7cpt&hl=en'); return false;"><img alt="Portuguese" border="0" align="absbottom" title="Portuguese" height="24" src="https://blogger.googleusercontent.com/img/b/R29vZ2xl/AVvXsEiBk66q7wqNBdThLaxfEc8dRObVwgBoozctBNUYNEtT25hFIaPzQHzbH3oq8AbRsGj6QTH1uFUzxDREoPkolDPwQ9K1dJ6wfQ30mUbU4rntjuA2MBBC9Eqz5n16uso6bCri-JRuwqwKerXj/s1600/Brazil.png" style="cursor: pointer;margin-right:8px" width="24"/></a>
<br />
 <a class="google_translate" href="#" target="_blank" rel="nofollow" title="Japanese" onclick="window.open('http://translate.google.com/translate?u='+encodeURIComponent(location.href)+'&langpair=auto%7cja&hl=en'); return false;"><img alt="Japanese" border="0" align="absbottom" title="Japanese" height="24" src="https://blogger.googleusercontent.com/img/b/R29vZ2xl/AVvXsEjPyHpIhYVn9it4QuVgtVHq5bHo59OyiZ3LaoD6SB13MRS1a2KdkzZW6RQ8Td6Vgmufvx7ZS7yfi2l-D5FfJTrQONycA1ar4Yq3Sy8C04BT92PsUls19uSTpeDLgF0wovBUHTrpdJUvbtCu/s1600/Japan.png" style="cursor: pointer;margin-right:8px" width="24"/></a>

 <a class="google_translate" href="#" target="_blank" rel="nofollow" title="Korean" onclick="window.open('http://translate.google.com/translate?u='+encodeURIComponent(location.href)+'&langpair=auto%7cko&hl=en'); return false;"><img alt="Korean" border="0" align="absbottom" title="Korean" height="24" src="https://blogger.googleusercontent.com/img/b/R29vZ2xl/AVvXsEhXQfNlBYhOxXGkxygHCI8KLrl3ULQOOiTrDi80AAtXVCwYpli0yQaUYoNskofJ8-I8Fhsu42NzgNlVicNsYdaC5h4byCIknv7II2qQ6qrVt8SwdozDEnBLrOOkq7w6vu0Ne8HJdPlwLATy/s1600/South+Korea.png" style="cursor: pointer;margin-right:8px" width="24"/></a>

 <a class="google_translate" href="#" target="_blank" rel="nofollow" title="Arabic" onclick="window.open('http://translate.google.com/translate?u='+encodeURIComponent(location.href)+'&langpair=auto%7car&hl=en'); return false;"><img alt="Arabic" border="0" align="absbottom" title="Arabic" height="24" src="https://blogger.googleusercontent.com/img/b/R29vZ2xl/AVvXsEiZWaVKgLVgtZZJ9LRgxhxTZ9dBkMRGyg4yRhuN2sUVTUEXKGj7m3InwW4vOYCoSPZWlWYbFJnqPo84UA2cDXC9lFeScAGONAkzgHsMLq-EozB1PBOwcUTTW3cQ128551USMlC8I2VrnusC/s1600/Saudi+Arabia.png" style="cursor: pointer;margin-right:8px" width="24"/></a>

 <a class="google_translate" href="#" target="_blank" rel="nofollow" title="Chinese Simplified" onclick="window.open('http://translate.google.com/translate?u='+encodeURIComponent(location.href)+'&langpair=auto%7czh-cn&hl=en'); return false;"><img alt="Chinese Simplified" border="0" align="absbottom" title="Chinese Simplified" height="24" src="https://blogger.googleusercontent.com/img/b/R29vZ2xl/AVvXsEiVoGooT_YhUUjzRU_yMjHcrl2k0iDOpXwmiNSJ6ay0vcPod7DSBEnboJ2_leF3yjzBBWHSTM-QYxDS9QNcyY9RRCOCzhc_nS-jioGvo3fBirUUviY062bLaloJvdW9eOSdOigiJxJyywab/s1600/China.png" style="cursor: pointer;margin-right:8px" width="24"/></a>
    <p><a href="#" id="example-hide" class="hideLink"
    onclick="showHide('example');return false;">Hide / </a><a href="http://helplogger.blogspot.com"><font size="1px">Get this widget</font></a></p>
</div>
     </div>

Step 4. Now click on Save

google translate, blogger widgets, gadgets for blogspot
And you're done! Enjoy (: